Andeh
the best cis-boy
PHOTOSHOP QUICK TIPS
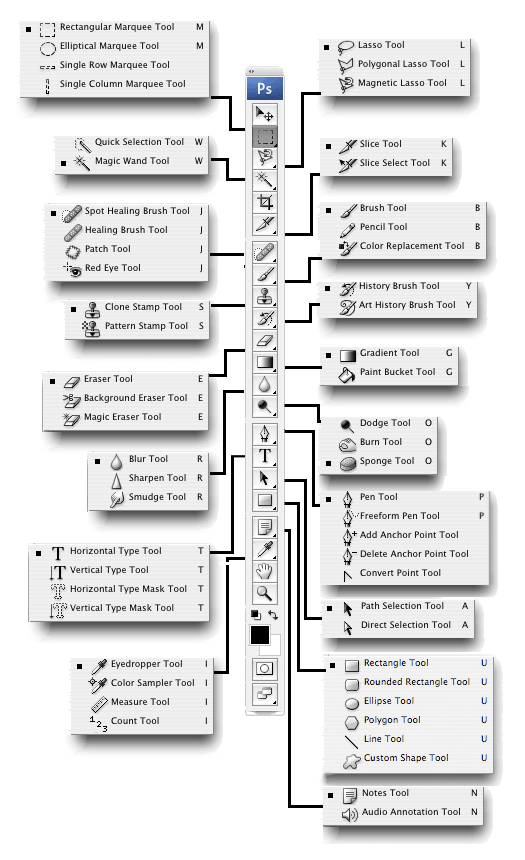
Knowing from personal experience, Photoshop is a massive program and can be quiet confusing if you do not know some of the basic tools.
In this post I will explain the basic photoshop tools.
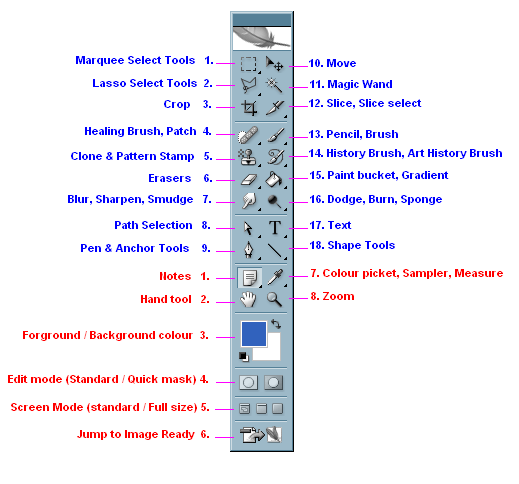
Active tools
Passive tools


1. Marquee select tools
The marquee tools are selection tools which allow you to select rectangles,
ellipses and 1-pixel rows and columns. To get a perfect circle or square
hold SHIFT when selecting.
2. Lasso select tools
The lasso tools allow you to select precise areas of an image by drawing or tracing
the selection outline. There are three lasso tools available.
Lasso Tool.
This is a freehand selection tool. Click and hold your left mouse button on the image
and draw your selection.
Polygonal Lasso Tool.
Similar to the lasso tool, except that instead of holding your mouse button down to draw,
left-click on various points to create a selection with a series of straight edges.
You can also hold down the Alt key (Windows) or Option key (Mac OS) to draw freehand sections.
Magnetic Lasso Tool.
This is a very handy tool for selecting areas which have reasonably well-defined edges.
Left-click at the starting point of your selection and simply move the mouse along the edge.
To finish drawing a selection, either click on the selection starting point or double-click anywhere.
3. Crop
The Crop tool allows you to select an area of an image and discard everything outside this area.
4. Healing Brush, Patch
The Healing Brush tool allows you to fix image imperfections such as scratches, blemishes, etc.
By sampling the surrounding area or using a predefined pattern you can blend the imperfections
into the rest of the image.
5. Clone & Pattern Stamp
Photoshop's clone stamp tool allows you to duplicate part of an image. The process involves setting
a sampling point in the image which will be used as a reference to create a new cloned area.
6. Erasers
The eraser is basically a brush which erases pixels as you drag it across the image.
Pixels are erased to transparency, or the background colour if the layer is locked.
7. Blur, Sharpen, Smudge
Blur - blurs the area where you paint.
Sharpen - increases contrast in the areas where you paint.
Smudge - blends the pixels where you paint simulating the action of dragging a finger through wet paint.
8. Path selection
This tool allows you to select a path, move a path or edit a path.
9. Pen & Anchor tools
With the pen tool you can make figures with straight edges and smooth figures, like a path, shape layer
or fill pixels. Anchor points are automaticly set and can be changed, deleted or added.
10. Move
Allows you to move a selected area or layer.
11. Magic Wand
The Magic Wand tool allows you to select an area of an image based on its colour. When you click an area
in an image with the magic wand, all areas which are a similar colour are selected.
You can specify various options to determine the exact selection.
12. Slice, Slice select
The Slice tool allows you to divide an image into smaller sections which fit together
like a jigsaw (but with straight edges).
There are two tools: Slice (which creates the slices)
and Slice Select (which enables you to select and modify existing slices).
Sliced images are commonly used for web design work, which sometimes requires images to be
broken up in this way.
13. Brush, Pencil
Photoshop provides two tools for drawing (painting) directly to the image: The brush tool and the pencil tool.
Both tools work basically the same way — you left-click and drag your mouse in the image to draw.
Painting uses the currently selected foreground colour.
The brush tool paints with smooth edges.
The pencil tool behaves much like the brush except that it has hard edges.
14. History Brush, Art History Brush
The history brush uses a previous state or snapshot of an image. The tool makes a copy of the image
as it was in a previous state, then uses the content of this copy to paint with.
15. Paint Bucket, Gradient
With the paintbucket you can colorfill a selected area, object or a complete layer.
The gradient tool works much as the Paint Bucket tool does, but it fills an object with a gradient instead of
a solid color.
16. Dodge, Burn, Sponge
The dodge tool allows you to lighten areas, the burn tool darkens areas and with the sponge tool
you can change the saturtion of the colors.
17. Text
This tool allows you to write text in your image/photo. There are a lot of fonts to try but you
have to check it for yourself.
18. Shape tools
With these tools you can make instant lines, rectangles, rounded rectangles, ellipse shapes,
polygon shapes, lines and custom shapes(wich you can choose from a menu in top of your screen).
1. Notes
With this tool you can make instant notes in a screen that pops up in the place of your click.
With the Audio Annotation tool you can record a audio note.
2. Hand tool
When you have a big img or your zoomed in you can navigate with this tool by clicking and holden
your img and scroll around.
3. Foreground / Background color
This tool allows you to change the foreground and background color by clicking on the boxes.
4. Edit mode (Standard / Quick Mask)
Quick Mask mode lets you edit any selection as a mask without using the
Channels palette and while viewing your image. The advantage of editing your selection
as a mask is that you can use almost any Photoshop tool or filter to modify the mask.
5. Screen mode (Standard / Full size)
Changes the working screen of photoshop.
6. Jump to Image Ready
With this button you automaticly open your selected img/photo in Image Ready.
7. Color Picker, Sampler, Measure
With the Color picker you can select a color of you img/photo to use as a new
foreground color(click left) or background color(click ALT+left).
With the measure tool you can measure distance and angle.
8. Zoom
With this tool you can Zoom in (click left) and out (click ALT+left).
________________________________________________________
If this helped + rep


 <3
<3