vRory
Unemployed.
- May 4, 2011
- 447
- 69
Firstly Lets start off with the downloads.
If you don't know how to download this isn't the right place for you.
Things you'll need through the tutorial:
EDIT: MAKE SURE YOU DOWNLOAD MYSQL CONNECTOR NET OTHERWISE THE EMULATOR WILL NOT WORK!
Additional
Please note if you are going to port forward please ignore this,
if not download:
Installing Xampp
Right, Now lets start off by downloading xampp.
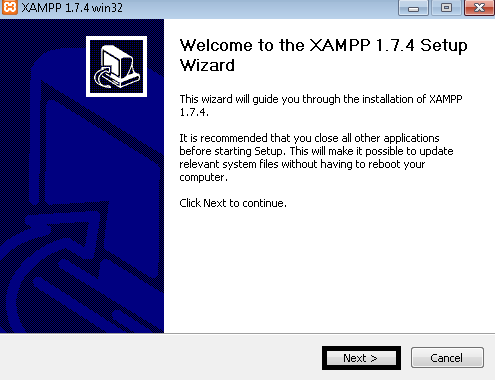
When xampp pops up press next.
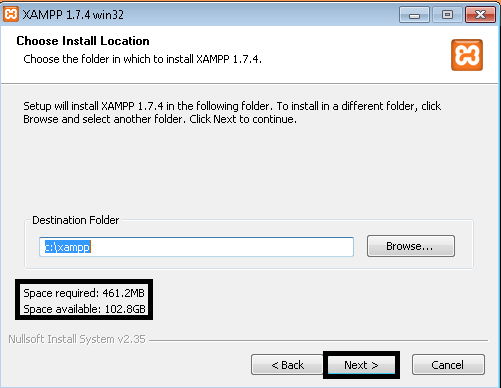
Check to see if you have the required space, you can check this by going to 'computer'.
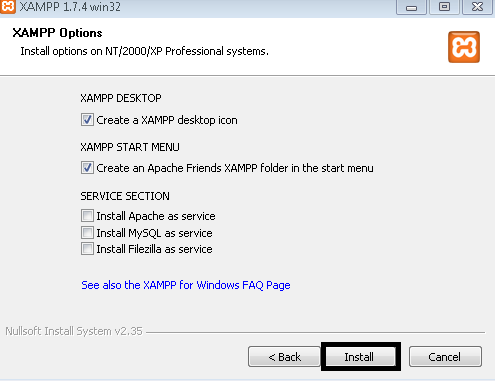
Then click install, This might take some time.
Whilst thats downloading we download Msql Connector.
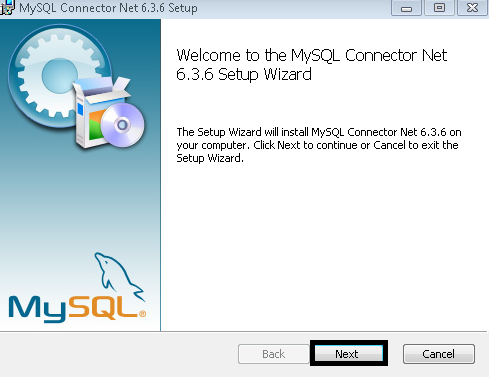
A installation pop-up will appear press next.
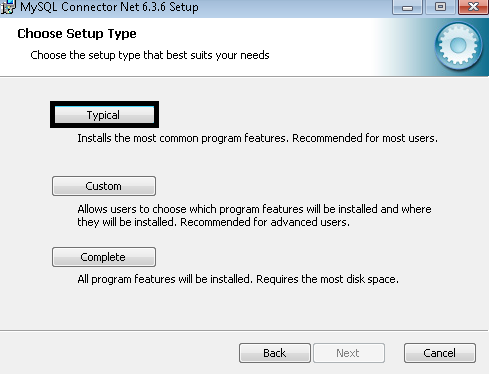
There will be 3 options pick the first one 'Typical'.
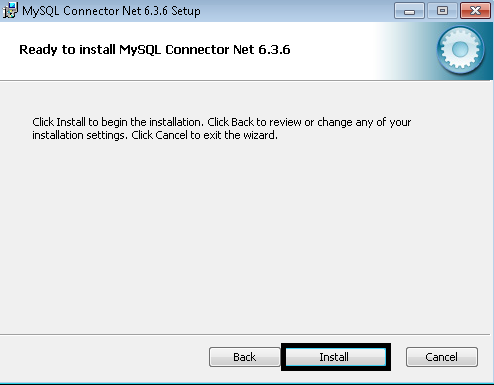
Then select 'install'.
By now xampp would be installed. If not don't worry just wait till it has finished.
Now head over to Your localhost,
Choose your language.
You should then be on a page looking like this:
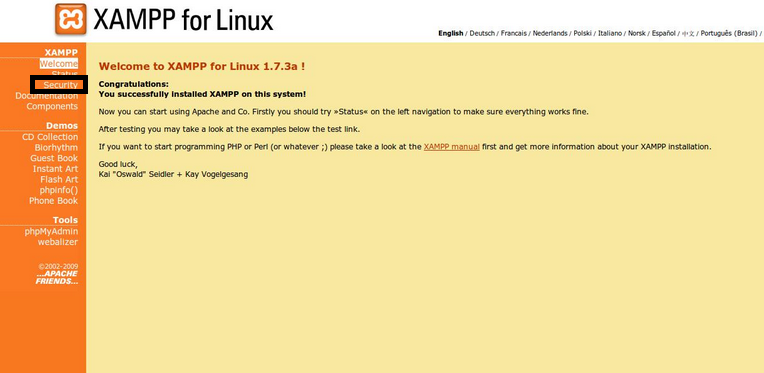
Now you want to click 'Security'.
Then you should see a page and it will have a underlined link on it. Click that the page should be looking somthing like this.
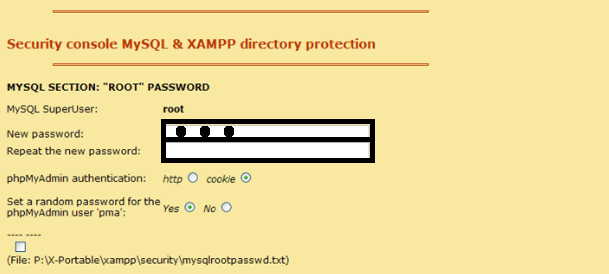
On the black outlined boxes Enter a password.
in the second box enter your password yet again.
Installing the Content management system
Now lets head over to htdocs. If you don't know where that is
When you are in htdocs, delete everything.
Now we have the htdocs empty we want to find the Cms we download earlier and simply extract them to c:/xampp/htdocs Using WinRAR, when done close WinRAR Now in htdocs look for a file called 'includes' then look for a file called 'inc-config' Edit the details matching your suitable needs. When done simply save it and close. Confused let me show you.
Setting up the Database.
Firstly open up your internet e.g. Google Chrome, in the url box at the top type in 'http://localhost/phpmyadmin'
When done, A Box should appear sign:
Then press 'Log-in or sign in'.
We are going to be using the database that was on the thread in 'breakzones v3 edit'.
Now create a db called 'db' No capitalization otherwise it will not config rightly with your Emu or site.
When you have created a db Click import. then go find the db
Most likely called Uberdata.sql or something like that.
Then see a tab called 'MYSQL' Click it and copy&paste this code
Then click 'GO'.
we are now finished setting up the database[/SIZE]
Setting up the emulator
Firstly, find your emulator. then click it, there should be a file called 'Config' Edit that with any text formed program.
Its just like setting up the previous file called 'inc-config' Because all we are doing is entering the ports and ips from your previous configuration file and no you cannot just copy and paste it from that file as it may not work happpy days .
.
Once you have set up the config file then you want to goto bin/release/ the fire icon click it twice.
We have now successfully set up the emulator.
Head over to your site done.
This is my first tutorial. I've never made one like this but here it is if i missed out any atall please tell me.
Credits to : Pejump2 (Cms) Meth0d (Uber) Breakzone (Emulator & Db).
Don't forget to hit 'Like' button if it helped.
And questions or need help leave a Message or add my msn [email protected]
IMPORTANT FOUND A FIX FOR THE EMULATOR! ALL THIS FILE TO UBER > BIN > RELEASE. IM 99% Sure it will work it worked on me,
-Rory
If you don't know how to download this isn't the right place for you.
Things you'll need through the tutorial:
You must be registered for see links
You must be registered for see links
You must be registered for see links
You must be registered for see links
You must be registered for see links
EDIT: MAKE SURE YOU DOWNLOAD MYSQL CONNECTOR NET OTHERWISE THE EMULATOR WILL NOT WORK!
Additional
Please note if you are going to port forward please ignore this,
if not download:
You must be registered for see links
Installing Xampp
Right, Now lets start off by downloading xampp.

When xampp pops up press next.

Check to see if you have the required space, you can check this by going to 'computer'.

Then click install, This might take some time.
Whilst thats downloading we download Msql Connector.

A installation pop-up will appear press next.

There will be 3 options pick the first one 'Typical'.

Then select 'install'.
By now xampp would be installed. If not don't worry just wait till it has finished.
Now head over to Your localhost,
You must be registered for see links
Choose your language.
You should then be on a page looking like this:

Now you want to click 'Security'.
Then you should see a page and it will have a underlined link on it. Click that the page should be looking somthing like this.

On the black outlined boxes Enter a password.
in the second box enter your password yet again.
Installing the Content management system
Now lets head over to htdocs. If you don't know where that is
Code:
c:/xampp/htdocsWhen you are in htdocs, delete everything.
Now we have the htdocs empty we want to find the Cms we download earlier and simply extract them to c:/xampp/htdocs Using WinRAR, when done close WinRAR Now in htdocs look for a file called 'includes' then look for a file called 'inc-config' Edit the details matching your suitable needs. When done simply save it and close. Confused let me show you.
PHP:
<?php
/*=======================================================================
| UberCMS - Advanced Website and Content Management System for uberEmu
| #######################################################################
| Copyright (c) 2010, Roy 'Meth0d'
| http://www.meth0d.org
| #######################################################################
| This program is free software: you can redistribute it and/or modify
| it under the terms of the GNU General Public License as published by
| the Free Software Foundation, either version 3 of the License, or
| (at your option) any later version.
| #######################################################################
| This program is distributed in the hope that it will be useful,
| but WITHOUT ANY WARRANTY; without even the implied warranty of
| MERCHANTABILITY or FITNESS FOR A PARTICULAR PURPOSE. See the
| GNU General Public License for more details.
\======================================================================*/

$config['Site']['twitter_name'] = "MeetHotel";
$config['Site']['hotel_name'] = "Habbo";
$config['Site']['www'] = "http://HAMACHI IP OR YOUR IP";
$config['Site']['hash_secret'] = "xCg532%@%gdvf^5DGaa6&*rFTfg^FD4\$OIFThrR_gh(ugf*/";

$config['MySQL']['hostname'] = "localhost";
$config['MySQL']['username'] = "root";
$config['MySQL']['password'] = "You Password you made earlier";
$config['MySQL']['database'] = "db";

$config['Game']['ip'] = "Hamachi ip or Your ip";
$config['Game']['port'] = 7575;

$config['MUS']['enabled'] = true;
$config['MUS']['ip'] = "127.0.0.1";
$config['MUS']['port'] = 6565;
?>
Setting up the Database.
Firstly open up your internet e.g. Google Chrome, in the url box at the top type in 'http://localhost/phpmyadmin'
When done, A Box should appear sign:
Code:
[SIZE="3"]Username: root

[SIZE="2"]Password: The one you set earlier[/SIZE]We are going to be using the database that was on the thread in 'breakzones v3 edit'.
Now create a db called 'db' No capitalization otherwise it will not config rightly with your Emu or site.
When you have created a db Click import. then go find the db
Most likely called Uberdata.sql or something like that.
Then see a tab called 'MYSQL' Click it and copy&paste this code
Code:
ALTER TABLE `site_config` ADD `web_build` VARCHAR( 255 ) NOT NULL;

INSERT INTO `site_cron` (`id`, `prio`, `enabled`, `scriptfile`, `last_exec`, `exec_every`) VALUES
(6, 5, '1', 'webbuild.php', 1304513524, 7200);we are now finished setting up the database[/SIZE]
Setting up the emulator
Firstly, find your emulator. then click it, there should be a file called 'Config' Edit that with any text formed program.
Its just like setting up the previous file called 'inc-config' Because all we are doing is entering the ports and ips from your previous configuration file and no you cannot just copy and paste it from that file as it may not work happpy days
 .
.Once you have set up the config file then you want to goto bin/release/ the fire icon click it twice.
We have now successfully set up the emulator.
Head over to your site done.
This is my first tutorial. I've never made one like this but here it is if i missed out any atall please tell me.
Credits to : Pejump2 (Cms) Meth0d (Uber) Breakzone (Emulator & Db).
Don't forget to hit 'Like' button if it helped.
And questions or need help leave a Message or add my msn [email protected]
IMPORTANT FOUND A FIX FOR THE EMULATOR! ALL THIS FILE TO UBER > BIN > RELEASE. IM 99% Sure it will work it worked on me,
You must be registered for see links
-Rory


 I have made loads of hotels in my past but i could never do a r63
  but no I have
  ??
??