Janko
Dr. Brandon
- May 24, 2011
- 28
- 6
* This Tutorial Is For Mac Users, However I Will Do One For Windows Users After!
1] Download the latest version of CraftBukkit Here!
2] Make a folder on your desktop and call it CraftBukkit. After you have done that rename the craftbukkit 1.2.3 snap shot just : CraftBukkit.jar And then just drag it in to your CraftBukkit folder.
3] Then open up Text Edit and type the following code in below [TAKE NOTE! ON THE -Xmx2G
CHANGE IT TO HOW MUCH RAM YOU HAVE ON YOUR COMPUTER LIKE 1G 2G 3G 4G 5G 6G THIS IS INPORTANT!]
4] Now look to the top of your screen on text edit and click, Format, Make Plain Text. Then save it as: Start.Command
5] Now drag the Start.Command to your desktop and put it in your CraftBukkit FOLDER. If you try and click it it wont work, So open up terminal and type the following: chmod a+x [then drag your start.command in and press enter!]
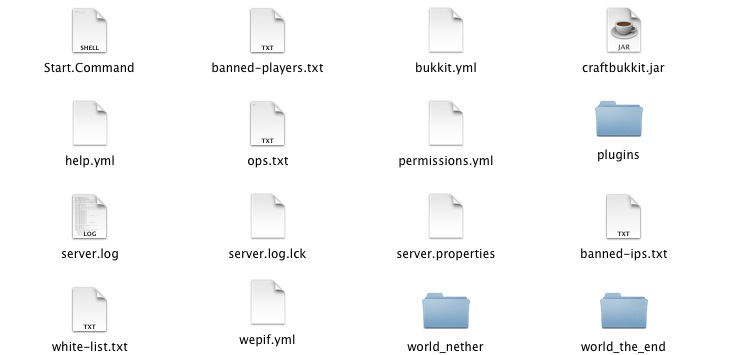
6] Random files will start to generate, It should look like this

Final Step, Port Forwarding: Now this is where it gets a little tricky. Download portmap from this link
Next open up portmap and click the + and type in on Local Port: 25565, and add mapping. Then open up terminal [ a new window ] and type: ifconfig . At the bottom it should show your ip. copy it and open up your server.properties file in your CraftBukkit folder and in the serverip=[paste in here no space between the =]
and on : Serverport=[type in 25565]
Save and click the start.command file on terminal and wait for it to load
BEHOLD!: You have your own minecraft server. Now just type your ip and port in the join server on minecraft and it will connect!
If you have any problems feel free to pm me.
Credits/
XRetro
CraftBukkit
P.S If this helped please like it :].
1] Download the latest version of CraftBukkit Here!
You must be registered for see links
[Click download Craftbukkit 1.2.3, The download will start :]2] Make a folder on your desktop and call it CraftBukkit. After you have done that rename the craftbukkit 1.2.3 snap shot just : CraftBukkit.jar And then just drag it in to your CraftBukkit folder.
3] Then open up Text Edit and type the following code in below [TAKE NOTE! ON THE -Xmx2G
CHANGE IT TO HOW MUCH RAM YOU HAVE ON YOUR COMPUTER LIKE 1G 2G 3G 4G 5G 6G THIS IS INPORTANT!]
#!/bin/bash
cd "$( dirname "$0" )"
java -server -Xmx2G -jar ./craftbukkit.jar
4] Now look to the top of your screen on text edit and click, Format, Make Plain Text. Then save it as: Start.Command
5] Now drag the Start.Command to your desktop and put it in your CraftBukkit FOLDER. If you try and click it it wont work, So open up terminal and type the following: chmod a+x [then drag your start.command in and press enter!]
6] Random files will start to generate, It should look like this

Final Step, Port Forwarding: Now this is where it gets a little tricky. Download portmap from this link
You must be registered for see links
[Click download application] Next open up portmap and click the + and type in on Local Port: 25565, and add mapping. Then open up terminal [ a new window ] and type: ifconfig . At the bottom it should show your ip. copy it and open up your server.properties file in your CraftBukkit folder and in the serverip=[paste in here no space between the =]
and on : Serverport=[type in 25565]
Save and click the start.command file on terminal and wait for it to load
BEHOLD!: You have your own minecraft server. Now just type your ip and port in the join server on minecraft and it will connect!
If you have any problems feel free to pm me.
Credits/
XRetro
CraftBukkit
P.S If this helped please like it :].


