Introduction
Many of you probably don't know me. I am a newbie. I have introduced myself to the DevBest community already. I decided to make this tutorial since I have no contribution to the community yet so I want this to be my first contribution. Here are some goals we want to achieve:
1.) Setup the server locally
2.) Test the server
3.) Configure the server for public access
We want those to be in order. We want a local sever first so we can test everything if it's functional. Once we know that it is functional, we can then move on to making it public.
This tutorial will not include portforwarding. If you want to know how to properly forward a port, check out
Downloads
Download these one by one if you want. The tutorial goes on one by one in the same order:
Server Related
1.) XAMPP 1.7.7
2.) PhoenixEMU 3.7.1 (Ask information about this from other users.)
3.) RevEMU 3.7.1
4.) RELEASE-63 SWFs
Download these only if you don't have them.
Tools
1.) 7zip
2.) Notepad++
7zip has no trial version and is free, meaning you can download it and install the full version for free.
Notepad++ is an optional download. However, it makes editing very easy and fast so I suggest you download it.
Setup Part I: Your Download Folder and Details.txt
1.) Create a folder somewhere in your PC and name it whatever you like. Let's call this folder the "Download Folder"
2.) I will refer to the Download Folder in some parts of the tutorial so make sure you know which one is your Download Folder. We will store all downloads here.
3.) Create a txt file in your download folder and name it whatver you like. Let's call this txt file the "Details.txt"
4.) I will refer to the Details.txt in some parts of the tutorial so make sure you know which one is your Details.txt. We will store all your details here.
Setup Part II: XAMPP 1.7.7
1.) Download XAMPP 1.7.7 if you haven't downloaded it yet.
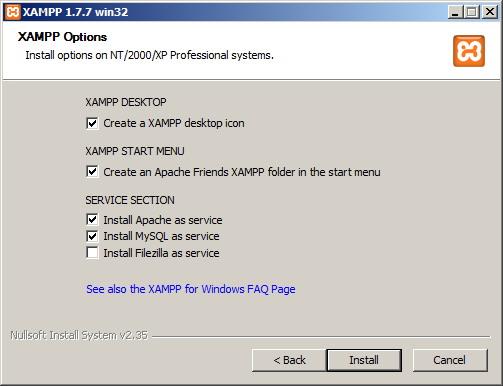
2.) Run the installer for XAMPP, select your language, read some information it says. Once you reach the window named "XAMPP Options", check the boxes like this:
3.) Install XAMPP to this directory "C:\xampp"
4.) Wait for install to finish. Once finished, make sure you have the XAMPP Control Panel running with Apache and MySQL services running, too.
5.) Open your browser and navigate to
6.) Select your XAMPP language and then navigate to
7.) Think of your password and then input it to the password fields and click the "Password Changing" button.
8.) Now open your Details.txt and type there:
9.) Navigate to C:\xampp\htdocs and delete everything
10.) Navigate to C:\xampp and delete the "WebDav" folder
11.) Navigate to C:\xampp\php and open "php.ini". Edit the values:
to
13.) Congratulations! As of this point, you have your own web server but nothing in it!
Setup Part III: PhoenixEMU 3.7.1
NOTICE: Phoenix 3.7.1 IS NOT FOR F ! There is a crack but it's crappy.
1.) Download PhoenixEMU 3.7.1 if you haven't downloaded it yet.
2.) Extract it to your Download Folder. The one we created a while ago.
3.) Open your browser and navigate to
4.) Type in your details. If you forgot, you can check out your Details.txt. The one we created a while ago.
5.) Click the "Databases" tab at the top.
6.) Create a new database called "rev_phoenix". Open your Details.txt and add this under MySQL settings:
7.) Open your database rev_phoenix from the sidebar of PhpMyAdmin.
8.) Click on the "Import" tab.
9.) Now click the "Choose file" button and browse for your database.sql from your Pheonix folder.
10.) Click the "Go" button. Wait for the import to finish. It takes a while since it's a big database. After it finishes importing, it should show you this message:

11.) Click the "SQL" tab at the top. There will be a big textbox. Input this code to the textbox:
It should look like this:

12.) Click the "Go" button.
13.) After it finishes the query. It should show you message that it's successful. Like the one when we uploaded the database.
14.) Navigate to your Phoenix folder and open "config.conf" with Notepad/Notepad++
15.) Edit the following values to yours:
16. Try running Phoenix 3.7.1, if it runs without reporting any other error, move on to the next step! If not, make sure you had all details right.
Setup Part IV: RevCMS 1.9.9
1.) Download RevCMS 1.9.9 if you haven't downloaded it yet.
2.) Extract it to your download folder.
3.) Copy the files inside "RevCMS 1.9.9" not "_MACOSX" and paste it to C:\xampp\htdocs
4.) Navigate to C:\xampp\htdocs\app\management and open "config.php"
5.) Edit the following values to yours:
6.) Navigate to C:\xampp\htdocs and delete the "thehabbos_api" folder because we won't be using that for now.
7.) Navigate to C:\xampp\htdocs\app\tpl\skins\Mango and open "account.php", "me.php" and "news.php", press Ctrl+H on your keyboard and replace "api.php" with "client" and save.
8.) Open up your browser and navigate to
9.) Register yourself. Once done, navigate to
10.) Type in your details, if you forgot, you can check out your Details.txt.
11.) Select rev_phoenix in the sidebar.
12.) Look for the table called "users".
13.) Look for your user and click "Edit".
14.) Look for the row called "rank" and change 1 to 7. Once done, click the "Go" button so it saves. Now you have an administrator account.
15.) Congratulations! You have setup your RevCMS! However, you cannot play yet. You still don't have your SWFs!
Setup Part V: RELEASE-63 SWFs
1.) Download it if you haven't downloaded it yet.
2.) Extract it to your Download Folder.
3.) Copy everything in the folder "SWF_pack" and paste it to C:\xampp\htdocs
4.) Navigate to C:\xampp\htdocs\r63 and look for "external_variables.txt".
5.) Press Ctrl+H on your keyboard and replace "habprohotel.co.uk" with "%predefined%". This makes sure that whatever domain you change to, it still stays predefined so you would not need to replace it again and again.
6.) You have setup your SWFs!
7.) Navigate to C:\xampp\htdocs\app\management and open "config.php".
8.) Edit the following values so it looks exactly like this:
9.) You have setup RevCMS with SWFs!
Play
Open your PhoenixEMU 3.7.1 and make sure Apache and MySQL services are running in the XAMPP Control Panel. Enjoy! You can now also toy with the configuration files of RevCMS which is config.php and PhoenixEMU which is config.conf!
After you have played and you think this is good enough, forward your ports (not included in tutorial). If you didn't change anything, it would be 30000, 30001, 3306 and 80. Once you have forwarded your ports, lookup your I.P. address in
Credits
Kryptos - developer of RevCMS
***** - *cough* developer of Phoenix
Vineen - He gave me the link for the SWFs
Mitchell - I think he's the one who released the SWFs
Thanks for reading my first contribution to the DevBest Community! Have a nice day! I hope you had fun while making your hotel!
Press like if this helped!
Reply below if you need help")
Many of you probably don't know me. I am a newbie. I have introduced myself to the DevBest community already. I decided to make this tutorial since I have no contribution to the community yet so I want this to be my first contribution. Here are some goals we want to achieve:
1.) Setup the server locally
2.) Test the server
3.) Configure the server for public access
We want those to be in order. We want a local sever first so we can test everything if it's functional. Once we know that it is functional, we can then move on to making it public.
This tutorial will not include portforwarding. If you want to know how to properly forward a port, check out
You must be registered for see links
they have a list of routers so you can look for yours there. If you are using a modem, however, you will not need to forward a port anymore. As long as you are directly connected from Modem -> PC.Downloads
Download these one by one if you want. The tutorial goes on one by one in the same order:
Server Related
1.) XAMPP 1.7.7
You must be registered for see links
You must be registered for see links
2.) PhoenixEMU 3.7.1 (Ask information about this from other users.)
3.) RevEMU 3.7.1
You must be registered for see links
You must be registered for see links
4.) RELEASE-63 SWFs
You must be registered for see links
You must be registered for see links
Download these only if you don't have them.
Tools
1.) 7zip
You must be registered for see links
You must be registered for see links
/ WinRAR
You must be registered for see links
(Download it there)2.) Notepad++
You must be registered for see links
You must be registered for see links
7zip has no trial version and is free, meaning you can download it and install the full version for free.
Notepad++ is an optional download. However, it makes editing very easy and fast so I suggest you download it.
Setup Part I: Your Download Folder and Details.txt
1.) Create a folder somewhere in your PC and name it whatever you like. Let's call this folder the "Download Folder"
2.) I will refer to the Download Folder in some parts of the tutorial so make sure you know which one is your Download Folder. We will store all downloads here.
3.) Create a txt file in your download folder and name it whatver you like. Let's call this txt file the "Details.txt"
4.) I will refer to the Details.txt in some parts of the tutorial so make sure you know which one is your Details.txt. We will store all your details here.
Setup Part II: XAMPP 1.7.7
1.) Download XAMPP 1.7.7 if you haven't downloaded it yet.
2.) Run the installer for XAMPP, select your language, read some information it says. Once you reach the window named "XAMPP Options", check the boxes like this:
3.) Install XAMPP to this directory "C:\xampp"
4.) Wait for install to finish. Once finished, make sure you have the XAMPP Control Panel running with Apache and MySQL services running, too.
5.) Open your browser and navigate to
You must be registered for see links
6.) Select your XAMPP language and then navigate to
You must be registered for see links
7.) Think of your password and then input it to the password fields and click the "Password Changing" button.
8.) Now open your Details.txt and type there:
Code:
MySQL Settings
Username: root
Password: (your new password)10.) Navigate to C:\xampp and delete the "WebDav" folder
11.) Navigate to C:\xampp\php and open "php.ini". Edit the values:
Code:
safe_mode=off
Code:
safe_mode=onSetup Part III: PhoenixEMU 3.7.1
NOTICE: Phoenix 3.7.1 IS NOT FOR F
! There is a crack but it's crappy.1.) Download PhoenixEMU 3.7.1 if you haven't downloaded it yet.
2.) Extract it to your Download Folder. The one we created a while ago.
3.) Open your browser and navigate to
You must be registered for see links
4.) Type in your details. If you forgot, you can check out your Details.txt. The one we created a while ago.
5.) Click the "Databases" tab at the top.
6.) Create a new database called "rev_phoenix". Open your Details.txt and add this under MySQL settings:
Code:
Database: rev_phoenix8.) Click on the "Import" tab.
9.) Now click the "Choose file" button and browse for your database.sql from your Pheonix folder.
10.) Click the "Go" button. Wait for the import to finish. It takes a while since it's a big database. After it finishes importing, it should show you this message:
11.) Click the "SQL" tab at the top. There will be a big textbox. Input this code to the textbox:
Code:
ALTER table `users` ADD `seckey` VARCHAR(999)12.) Click the "Go" button.
13.) After it finishes the query. It should show you message that it's successful. Like the one when we uploaded the database.
14.) Navigate to your Phoenix folder and open "config.conf" with Notepad/Notepad++
15.) Edit the following values to yours:
Code:
## Licence Information
username=(If you bought Phoenix, you'll know)
password=(If you bought Phoenix, you'll know)


## MySQL Configuration
db.hostname=localhost <------- leave that as localhost
db.port=3306 <------------------ leave that as 3306
db.username=root <------------ leave that as root
db.password=(Your MySQL password, if you forgot, you can check out your Details.txt)
db.name=rev_phoenix <-------- Make sure that is rev_phoenix

Leave the rest as is.Setup Part IV: RevCMS 1.9.9
1.) Download RevCMS 1.9.9 if you haven't downloaded it yet.
2.) Extract it to your download folder.
3.) Copy the files inside "RevCMS 1.9.9" not "_MACOSX" and paste it to C:\xampp\htdocs
4.) Navigate to C:\xampp\htdocs\app\management and open "config.php"
5.) Edit the following values to yours:
PHP:
$_CONFIG['mysql']['connection_type'] = 'connect'; //sometimes I get errors when it's on pconnect so I'd put it as connect

$_CONFIG['mysql']['hostname'] = 'localhost'; //leave that as is

$_CONFIG['mysql']['username'] = 'root'; //leave that as is

$_CONFIG['mysql']['password'] = '12399'; //your MySQL password, if you forgot, you can check out your Details.txt

$_CONFIG['mysql']['database'] = 'rev_phoenix'; //make sure this is rev_phoenix

$_CONFIG['mysql']['port'] = '3306'; //leave that as is

//You can change the other settings later, for now this are the mandatory settings7.) Navigate to C:\xampp\htdocs\app\tpl\skins\Mango and open "account.php", "me.php" and "news.php", press Ctrl+H on your keyboard and replace "api.php" with "client" and save.
8.) Open up your browser and navigate to
You must be registered for see links
9.) Register yourself. Once done, navigate to
You must be registered for see links
10.) Type in your details, if you forgot, you can check out your Details.txt.
11.) Select rev_phoenix in the sidebar.
12.) Look for the table called "users".
13.) Look for your user and click "Edit".
14.) Look for the row called "rank" and change 1 to 7. Once done, click the "Go" button so it saves. Now you have an administrator account.
15.) Congratulations! You have setup your RevCMS! However, you cannot play yet. You still don't have your SWFs!
Setup Part V: RELEASE-63 SWFs
1.) Download it if you haven't downloaded it yet.
2.) Extract it to your Download Folder.
3.) Copy everything in the folder "SWF_pack" and paste it to C:\xampp\htdocs
4.) Navigate to C:\xampp\htdocs\r63 and look for "external_variables.txt".
5.) Press Ctrl+H on your keyboard and replace "habprohotel.co.uk" with "%predefined%". This makes sure that whatever domain you change to, it still stays predefined so you would not need to replace it again and again.
6.) You have setup your SWFs!
7.) Navigate to C:\xampp\htdocs\app\management and open "config.php".
8.) Edit the following values so it looks exactly like this:
PHP:
$_CONFIG['hotel']['external_vars'] = 'http://localhost/r63/external_variables.txt'; //make sure it looks exactly like this

$_CONFIG['hotel']['external_texts'] = 'http://localhost/r63/external_flash_texts.txt'; //make sure it looks exactly like this

$_CONFIG['hotel']['product_data'] = 'http://localhost/r63/productdata.txt'; //make sure it looks exactly like this

$_CONFIG['hotel']['furni_data'] = 'http://localhost/r63/furnidata.txt'; //make sure it looks exactly like this

$_CONFIG['hotel']['swf_folder'] = 'http://localhost/r63'; //make sure it looks exactly like thisPlay
Open your PhoenixEMU 3.7.1 and make sure Apache and MySQL services are running in the XAMPP Control Panel. Enjoy! You can now also toy with the configuration files of RevCMS which is config.php and PhoenixEMU which is config.conf!
After you have played and you think this is good enough, forward your ports (not included in tutorial). If you didn't change anything, it would be 30000, 30001, 3306 and 80. Once you have forwarded your ports, lookup your I.P. address in
You must be registered for see links
, copy it edit the I.P. addresses and URLs in your configuration files (config.php and config.conf)Credits
Kryptos - developer of RevCMS
***** - *cough* developer of Phoenix
Vineen - He gave me the link for the SWFs
Mitchell - I think he's the one who released the SWFs
Thanks for reading my first contribution to the DevBest Community! Have a nice day! I hope you had fun while making your hotel!
Press like if this helped!
Reply below if you need help
")


 Goodluck bro.